| View previous topic :: View next topic |
| Author |
Message |
pazz463
*

Age: 33
Zodiac: 
Joined: 18 Jan 2018
Posts: 26
Location: Glasgow
|
 Posted: Sun Apr 22, 2018 12:26 Post subject: Anti roll bar Posted: Sun Apr 22, 2018 12:26 Post subject: Anti roll bar |
 |
|
Hey folks.
Hoping to get some help with tricks or tips for changing the anti roll bar bushes. Got new bushes and put them on the bar. Trying to get everything back in place seems impossible. Obviously the new bushes are bigger and tighter since there is no wear on them but its crazy hard to get them in place. So just wanting to try some generic tricks anyone knows but its an 06 shogun sport 2.5.
Cheers |
|
| Back to top |
|
 |
Google
Sponsor

|
| Posted: Sun Apr 22, 2018 12:26 Post subject: Google Ads keep the POCUK free to join! |
|
|
|
|
| Back to top |
|
|
cymraeg
**


Age: 40
Zodiac: 
Joined: 24 Jan 2011
Posts: 108
Location: Cambridgeshire
|
| Posted: Sun Apr 22, 2018 15:30 Post subject: |
|
|
| Did one side at a time and used a pry bar to help squash the bar/bush intonplace to get the threads on the bolts started |
|
| Back to top |
|
|
peteinchad
LifeTime Member

Joined: 07 Jan 2013
Posts: 15079
Location: UK
|
| Posted: Sun Apr 22, 2018 15:51 Post subject: |
|
|
| Try using a jack to push it into place. |
|
| Back to top |
|
|
pazz463
*
Age: 33
Zodiac:
Joined: 18 Jan 2018
Posts: 26
Location: Glasgow
|
| Posted: Sun Apr 22, 2018 19:19 Post subject: |
|
|
Tryed a jack and couldnt get it to balance well enough. Using a pry bar seems pretty logical.lol. did you do outside then inside? Or inside 1st?
Thanks for the replys. |
|
| Back to top |
|
|
peteinchad
LifeTime Member
Joined: 07 Jan 2013
Posts: 15079
Location: UK
|
| Posted: Sun Apr 22, 2018 20:18 Post subject: |
|
|
| I think the Sport must be different to the standard Shogun / Pajero (MkII) as the ARB pushed up to the chassis with very little effort as it is under very slight tension. |
|
| Back to top |
|
|
Simon_W
*******


Joined: 21 May 2013
Posts: 4881
Location: Watford
|
| Posted: Sun Apr 22, 2018 22:43 Post subject: |
|
|
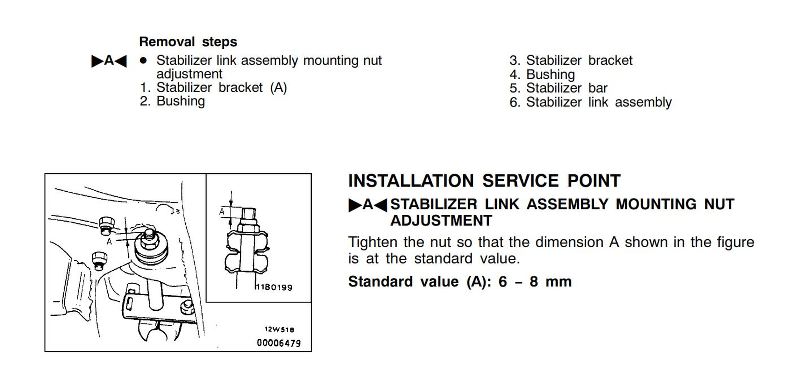
I've replaced all the anti-roll bar ('stabilizer' in the workshop manual) bushings on my Challenger without too much difficulty. This is the same vehicle as the Shogun Sport. The removal steps are to work from the outside bushings first, then the bushings that hold the bar in place and finally the link assembly. All as per diagram and instructions below.. Note that the outer bushings need to go onto the bars a certain way so that the flat surfaces fit the clamp brackets. If they are on the wrong way, you'll struggle to get the clamps done up.
If you're using polybushes use some copper grease on the inside of them to prevent squeaks. You'll regret it if you don't, and will have to do the job again. Like I did. 
The other things to note are to keep both front wheels level, or else you'll put torsional force on the bar and that will make things both difficult and dangerous. Use axle stands to take the weight of the bar when you remove the inner bushings

 |
|
| Back to top |
|
|
pazz463
*
Age: 33
Zodiac:
Joined: 18 Jan 2018
Posts: 26
Location: Glasgow
|
| Posted: Mon Apr 30, 2018 19:42 Post subject: |
|
|
| Thanks for these responses. Got a chance to work on it today and totaly forgot i had asked on here. Wish i had seen these cause i forgot copperslip. Had it sitting but forgot. But good news is i finaly got it on anyway. Molegrips were the answer. Prybar was to long and couldnt fit properly and the jack just wasnt for playing ball but the molegrips held the clamps enough to get the bolts in and helped push the bushings into place. So thanks for all the help. Just wish i remembered to look here. doh!! |
|
| Back to top |
|
|
|


