| View previous topic :: View next topic |
| Author |
Message |
tripper
Newbie

Age: 47
Zodiac: 
Joined: 26 Apr 2010
Posts: 6
Location: west midlands
|
 Posted: Tue Jun 08, 2010 11:34 Post subject: Possible rev counter fix Posted: Tue Jun 08, 2010 11:34 Post subject: Possible rev counter fix |
 |
|
| Hello everyone right, had the clocks out of my paj yesterday and stripped the rev counter down completely till you can see the little motor that runs it, will have to take needle and clock face off. when you look at the wire that is wrapped around the motor 2 parts of the wire run to 2 seperate little silver pins these wires cross over each other then are soldered to the pins if yours is like mine the wires where touching each other i pushed them apart with a little screwdriver so there is no chance of them coming into contact with each other again, and its worked for the last two days without a hitch it could be worth a try i only wish i`d took photo`s but didn`t think at the time. hope it works for anyone. |
|
| Back to top |
|
 |
Google
Sponsor

|
| Posted: Tue Jun 08, 2010 11:34 Post subject: Google Ads keep the POCUK free to join! |
|
|
|
|
| Back to top |
|
|
gegs750k4
********


Age: 51
Zodiac:
Joined: 24 Dec 2008
Posts: 6513
Location: Wigan
|
| Posted: Tue Jun 08, 2010 21:17 Post subject: |
|
|
strip it out and get some pics 
might have a look at this at the weekend if i don't get bleedin called out. |
|
| Back to top |
|
|
dannypaj
LifeTime Member


Age: 49
Zodiac: 
Joined: 11 Aug 2009
Posts: 474
Location: Bradford
|
| Posted: Wed Jun 09, 2010 18:58 Post subject: |
|
|
| Nice one, mine goes off and comes back with a tap on the plastic face. Sounds like they could be touching. |
|
| Back to top |
|
|
Si7
******


Age: 52
Zodiac:
Joined: 03 Mar 2009
Posts: 1558
Location: Central UK
|
| Posted: Mon Jun 14, 2010 10:33 Post subject: |
|
|
| Wish you had pics! Is the wire you're refering to a lacquered copper wire or is it bare? Sounds a good tip, I've got this intermittent rev counter problem as many have, be nice to get a definitive answer. |
|
| Back to top |
|
|
dannypaj
LifeTime Member
Age: 49
Zodiac:
Joined: 11 Aug 2009
Posts: 474
Location: Bradford
|
| Posted: Tue Jul 06, 2010 19:43 Post subject: |
|
|
Following on from tripper, I had a look at my rev counter and it seems ok so far. It was off and on so I'll report back if it goes off again.
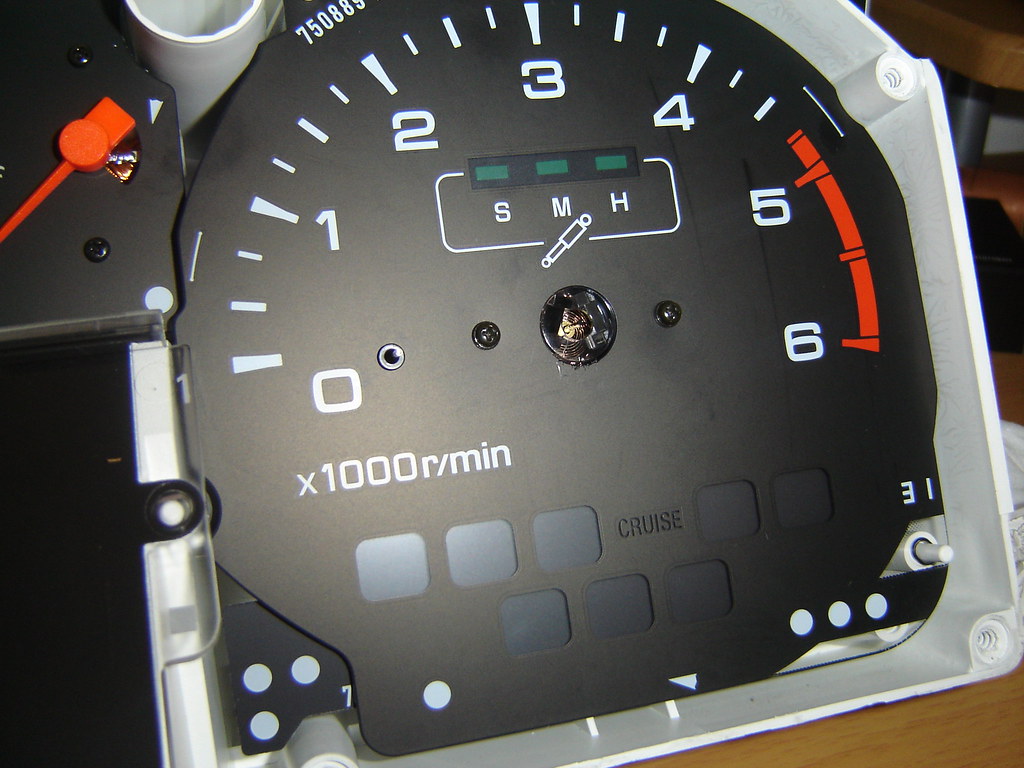
I found four wires which I think shouldn't be touching anything. See the photos below for a description:-
1. Remove the outer shroud from the clock pod (two screws), detatching whatever switch cables you have going there. I had hazzard lights, rear screen heater, immobiliser fob socket and rear fog lights.
2. Once this is off you you can loosen the clock pod screws (three screws), then reach behind and remove the cable plugs. I had five. Two on the right, three on the left. They are the type which require you to press a release section so they unplug. Once this is done you can take the pod somwhere else to work.
3. Remove all the screws holding the plastic cover from the pod. This was quite brittle on mine and some of the plastic cracked away where the screws go through. Once this is off it should release the plastic cover and the black dial surround section.
4. You should have the rev counter accessible at this point.

5. Remove the needle. I found this needed a small screwdriver underneath to use as a lever and use your finger opposite it to pull it off. It did take quite a lot of force to get it off. The spindle seems quite sturdy so shouldn't be a problem if you keep the force straight up and don't bend the spindle to the side too much. I did scratch the face underneath where the needle sits by accident so you could put some tape over the end of the screwdriver to avoid this, although it's not seen when the needle is back on.
6. Remve the two black screws.

7. The dial face should come off easily now leaving the mechanism on show.

8. If you look closely you should see the two wires crossing over each other and going to two silver pins on the left. the bottom one can be carefully bent down so it has no chance of touching the other one. This is the red circle on the left. This didn't fix my intermitent problem so got the whole thing out again.
The two other red circles show where two thin wires come from the base of the coil and go to pins on the right. I liftred these two wires and pushed them over the white bits marked so they wern't touching the coil as they came over. This seems to have worked on mine.

Fitting is the opposite and pretty simple. Remember to clean the face and covers when you put it back together to avoid any niggling dust/dirt/finger marks under the face when it's back on the car.
I'm not sure exactly how the rev counter motor works so I just tried pushing the neddle back on as close to zero as possible. I'm sure it's showing a little higher revs at idle then before, but not much. I don't think it would be worth the hassle of woring out how to calibrate it correctly.
Good luck! |
|
| Back to top |
|
|
El Ricko
********
Joined: 12 May 2008
Posts: 5453
Location: UK
|
| Posted: Wed Jul 07, 2010 12:22 Post subject: |
|
|
| a good tip is to wear fresh latex gloves to prevent the oil from your fingers marking the facia |
|
| Back to top |
|
|
dannypaj
LifeTime Member
Age: 49
Zodiac:
Joined: 11 Aug 2009
Posts: 474
Location: Bradford
|
| Posted: Thu Jul 08, 2010 7:22 Post subject: |
|
|
Not so good news, my rev counter still goes off intermittantly. Hard to say if it's better than it was, it seems to be on a lot more than it is off now.
The fault finding contiunues..... |
|
| Back to top |
|
|
BLASTO
Newbie
Age: 73
Zodiac: 
Joined: 07 Jan 2020
Posts: 1
Location: Coffs Harbour
|
| Posted: Wed Jan 08, 2020 2:24 Post subject: |
|
|
| Thanks for the pics. My guage was working intermittantly. I had a spare guage but not working at all. Tried this on the imtermittant one and it worked a bit then faded. The one that wasn't working at all works fine now. It took a few goes of pulling the instrument console in and out but running great now. The plus is you get really quick at pulling the instrument cluster on and off |
|
| Back to top |
|
|
|


