| View previous topic :: View next topic |
| Author |
Message |
richardsth
******


Age: 61
Zodiac: 
Joined: 01 Feb 2006
Posts: 1397
Location: Essex
|
 Posted: Wed Jul 01, 2009 21:11 Post subject: 3" lift finally done Posted: Wed Jul 01, 2009 21:11 Post subject: 3" lift finally done |
 |
|
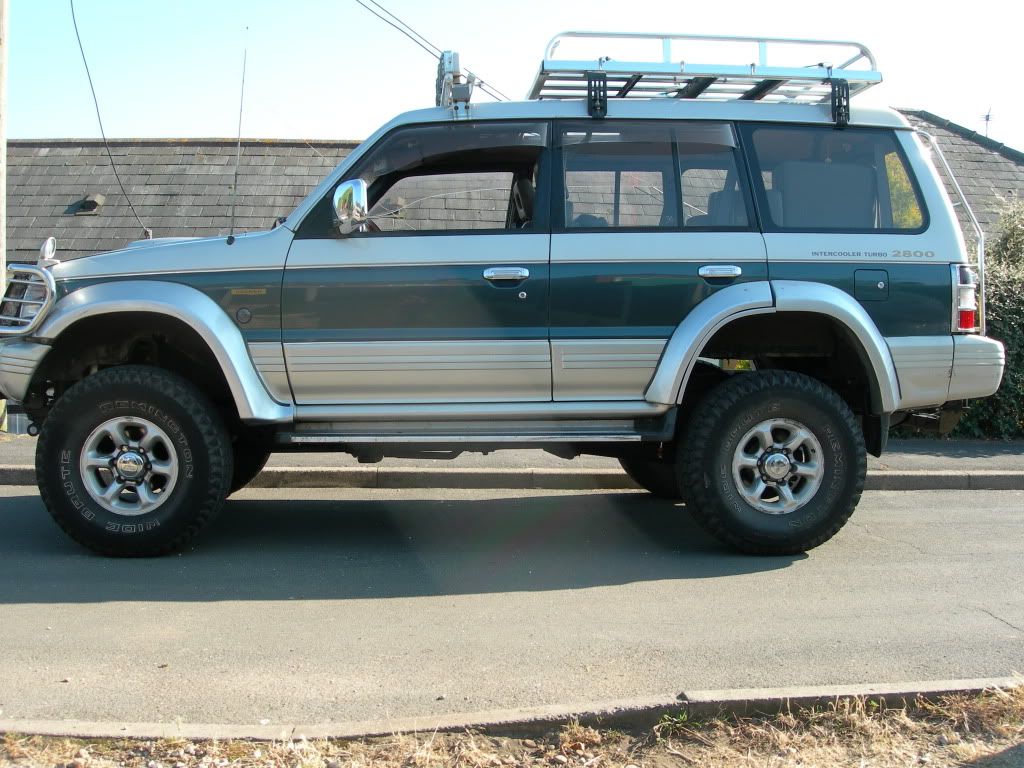
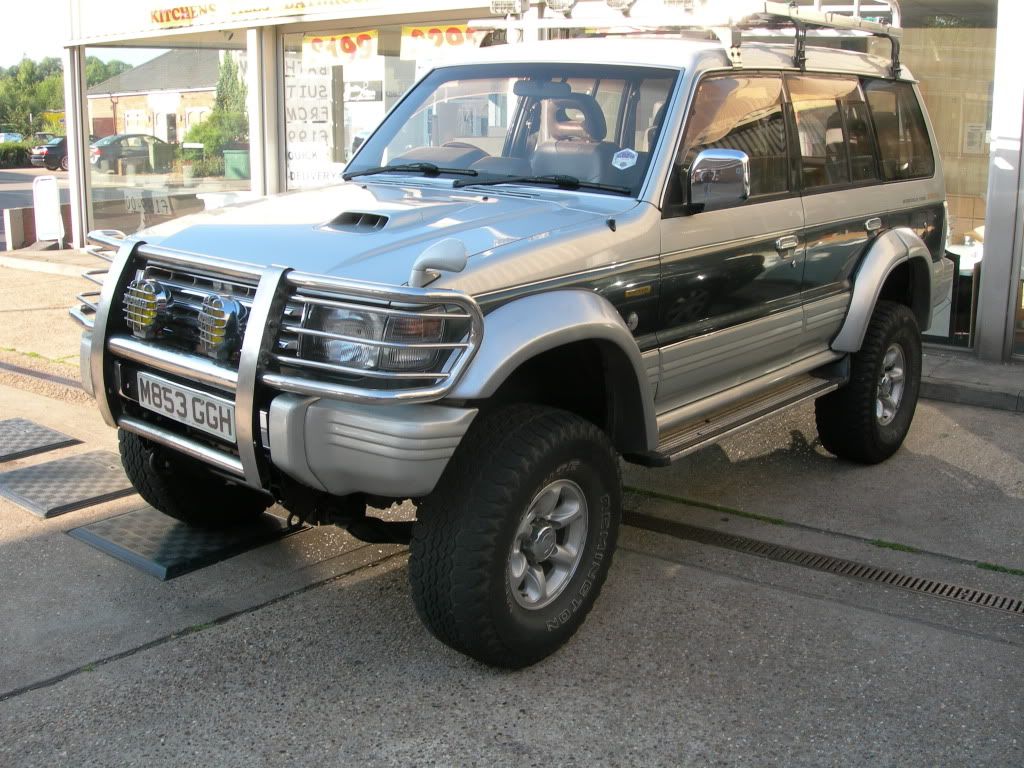
Well I've finally done it, I've fitted my 3" lift after having all the bits for a year. I would have done it sooner but I couldn't find anyone to sort out the bumper brackets until subzero came to the rescue. He does some flat plates of steel and bolts that will raise your bumpers to what ever height you want. Once again I can not thank him enough for being on call as I would have come a cropper at certain points which no one ever mentions, but I will (later).
I'm no mechanic (network techie) but i was able to do this all on my own over a weekend. If there are two or of you, you can easily do this within a few hours. One other point to note, don't do this on a Sunday if you need your motor for work Monday morning, trust me something WILL go wrong !
So apart from basic tools, this called for my trusty high lift jack. I know subzero doesn't like them but used correctly, they're indespensible. Other tools to have are two 17mm socket spanners for undoing the existing body mount bolts and a mallet. This so that you can bash the bolts out that have captive washers on them.
So here we go.
First off, apply handbrake, stick it park and chock the wheels. This is just in case the jack slips or the motor moves while jacking. Mine did but then again I was working on a slope.
Remove front & rear bumpers.
Remove front drivers side light.
Remove front drivers headlamp
Remove water bottle
Remove all plastic trim around doors holding carpets down
Lift up rear carpet halfway to expose bolt holes
remove plastic cover for rear air con unit
Now you're ready to undo bolts, On a LWB there are twelve of them, six each side along the main chassis members and they are all visible from underneath. The locations are as follows.
2 directly below the rear lights under rubber bung
2 in the rear under the carper covered by a bung. one can only be reached by removing the air con cover
2 above the rear wheel arch inside the cab under the seats
2 next to the centre pillar
2 at the bottom of each footwell, the front side panels have to come off here
1 underneath the water bottle
1 underneath the front headlamp
These weren't a bad as people say to remove. They are hidden by foil covers and the foil is covered in years of crud, hence you may not be able to find the, but poke around and the foil will break. When you remove the bolts, they will not come up as they have a long tab on them. I used a centre punch and mallet to drive them up. Once they are free, you align the tab with the elongated holes and they come out.
Now you're almost ready to jack but certain things need to be either loosened or undone. On a 2" it's not such a problem, but a 3" is completly different.
At the back remove the four screws holding in the fuel pipe under the fuel flap.
Remove the fuel pipe clamp
Undo the clamp that holds the air con pipes together.
Thanks to Subzero for the above, all I ever heard about was the fuel clamp. Now to the front. undo the airfilter pipe, remove the abs sensor clamp by the front passenger suspension, this will give you loads of slack to play with. Undo the front passenger suspension actuator clamp underneath the main battery tray. If you dont do this, well you'll see from the photos. remove the radiator fan shroud. I just removed the bottom band but it still caught the blades. When you are removing the shroud, take your time. I took a hacksaw to mine and cut through in to the rad, d'oh! A new one cost me £100! Undo both radiator hoses and the pipes to the rad from the auto gearbox. Loosen both fuel pipes and unhook the throttle cable from the clamp. And loosen or remove the heater hoses.
Now you're ready to start jacking. Stick the jack under one of the rear corners and start jacking. At first it looks like it's not going right and you think that you may have forgotten to remove a bolt. Don't worry, this is due to the weight of the cab pressing down on the suspension. When you lift up, you release the weight on the suspension it also rises. You'll reach a point where this stops and the cab rises on it's own. Get it up to four inches and stick your block with a bolt and just nip it on. Now do the the other rear. Go to the front and place the jack under the front lip of the cab next to the bolt. This very thin piece of body doesn't look thick enough to support its weight but it does. The lip deformed slightly but it is covered by the bumper end caps anyway. Whilst you are jacking, feed through some of the coil in the brake cable towards the wheels. If you removed the abs clamp and suspension cable previously, no damage will occur here. When all four corners are in, take a breather and admire your work. It's easy now to jack up slightly and insert the remaining blocks. Now you can tighten them up properly.
If you don't disconnect the bottom rad hose, you'll notice that it's being crushed by the power steering pipes. Undo the clamps for these by the rad and bend them up. These pipe are unusally soft so this was easy to do.
With a three inch lift, many things are at max stretch and other didn't reach. The following reach but only just and will need extending to allow for movement.
Top & bottom rad hose
Auto gearbox pipes hoses on radiator (washing machine hose works temporarily here)
Both fuel pipes
Air filter needs modifying (it's unbolted and cabled tied up )
The heater hoses are no longer "S" shapped but pulled taut, so thse will need lengthening also.
On to the interior, the gearlever will not stay in 2wd as it hits the surround, so you have to cut out a small section to fix this, and that would you believe is that. So despite what people say, a 2" lift is easy and requires no mod but a 3" is tricky. I've photod each step of the way and hopefully it helps. Sorry I forgot, the rear bumper will not go back on as the towing hook is in the way. You're not going to cut this off so it's easier to cut out a slot in the bumper. Here's the link to the full procedure
http://s42.photobucket.com/albums/e344/richardsth/Body%20Lift/
It's brought back my grin as I'm now up in the air but I gotta do something about those wheels ! Yes, they are 33's
And here's the finished article. Remember, If I can do it, so can you.
 |
|
| Back to top |
|
 |
Google
Sponsor

|
| Posted: Wed Jul 01, 2009 21:11 Post subject: Google Ads keep the POCUK free to join! |
|
|
|
|
| Back to top |
|
|
DawnH
LifeTime Member


Age: 56
Zodiac: 
Joined: 08 Sep 2008
Posts: 6828
Location: newport, gwent
|
| Posted: Wed Jul 01, 2009 21:44 Post subject: |
|
|
cool!!!!!  and well written up!!!!!! and well written up!!!!!!  |
|
| Back to top |
|
|
kev 190164
*****

Age: 60
Zodiac: 
Joined: 23 Oct 2007
Posts: 678
Location: braintree ESSEX
|
| Posted: Wed Jul 01, 2009 22:11 Post subject: |
|
|
| looks smart your almost ther |
|
| Back to top |
|
|
SHED
LifeTime Member
Age: 50
Zodiac: 
Joined: 28 Sep 2004
Posts: 5495
Location: WEST HULL
|
| Posted: Wed Jul 01, 2009 22:27 Post subject: |
|
|
| nice one |
|
| Back to top |
|
|
jetskidavid
*****

Age: 54
Zodiac:
Joined: 13 Nov 2008
Posts: 756
Location: FOLKESTONE
|
| Posted: Wed Jul 01, 2009 22:29 Post subject: |
|
|
looking good and it makes you feel good when driving it
and you did it!!!!!  |
|
| Back to top |
|
|
subzero
*******


Age: 48
Zodiac: 
Joined: 24 Sep 2006
Posts: 2687
Location: folkestone
|
| Posted: Wed Jul 01, 2009 23:40 Post subject: |
|
|
looks good and good wright up
can i turn me phone off this weekend now then  |
|
| Back to top |
|
|
mauro
Newbie

Joined: 23 Jun 2009
Posts: 1
Location: Venezuela
|
| Posted: Thu Jul 02, 2009 5:31 Post subject: |
|
|
| nice job!! looks awesome |
|
| Back to top |
|
|
richardsth
******
Age: 61
Zodiac:
Joined: 01 Feb 2006
Posts: 1397
Location: Essex
|
| Posted: Thu Jul 02, 2009 7:14 Post subject: |
|
|
| subzero wrote: |
looks good and good wright up
can i turn me phone off this weekend now then |
yep, you can stand down now. |
|
| Back to top |
|
|
richardsth
******
Age: 61
Zodiac:
Joined: 01 Feb 2006
Posts: 1397
Location: Essex
|
| Posted: Thu Jul 02, 2009 12:34 Post subject: Is this normal? |
|
|
| I've just done a 3" body lift and perhaps it's me being paranoid but I noticed that it was *beeb* hot around the gearbox lever and inside the cubby hole under the radio today. I've checked that all was OK but if you know my history with motors and fire, you'll inderstand where I'm coming from. It's the first time that I've driven it this week in the hot weather so maybe it was that. So is this normal ? If not where is this heat coming from ? The exhaust pipe is runs almost directly under the drivers seat so I didn't think it could be that. |
|
| Back to top |
|
|
ramskill
****


Age: 42
Zodiac:
Joined: 22 Oct 2007
Posts: 405
Location: rotherham, wath
|
| Posted: Thu Jul 02, 2009 16:24 Post subject: |
|
|
nice job pal......im whatin to lift mine but im a bit of a  allot more reading me thinks allot more reading me thinks |
|
| Back to top |
|
|
richardsth
******
Age: 61
Zodiac:
Joined: 01 Feb 2006
Posts: 1397
Location: Essex
|
| Posted: Thu Jul 02, 2009 19:55 Post subject: |
|
|
just go for it. A 2" is easy but be prepared for lots of modification for a 3". Buy a metre length of 6mm & 8mm hose for the fuel pipes and a metre of flexible 38mm hose for the rad hoses. A washing machine hose will do for the AT hoses to get you by and I think that's 12mm. I can't remember what the heater hoses are but they could do with extending also. Whatever you don't use can be kept as spares as hoses always go eventually. They're all avalable from hoseworld and they turned up next day.
Do it! |
|
| Back to top |
|
|
ramskill
****
Age: 42
Zodiac:
Joined: 22 Oct 2007
Posts: 405
Location: rotherham, wath
|
| Posted: Thu Jul 02, 2009 20:09 Post subject: |
|
|
[quote="richardsth"]just go for it. A 2" is easy but be prepared for lots of modification for a 3". Buy a metre length of 6mm & 8mm hose for the fuel pipes and a metre of flexible 38mm hose for the rad hoses. A washing machine hose will do for the AT hoses to get you by and I think that's 12mm. I can't remember what the heater hoses are but they could do with extending also. Whatever you don't use can be kept as spares as hoses always go eventually. They're all avalable from hoseworld and they turned up next day.
think i mint pay some one after that |
|
| Back to top |
|
|
subzero
*******
Age: 48
Zodiac:
Joined: 24 Sep 2006
Posts: 2687
Location: folkestone
|
| Posted: Thu Jul 02, 2009 22:50 Post subject: |
|
|
no what he was trying to say you need to do that for a 3" lift
for a 2" lift you only have to trim the small bit for the transfer leaver
remove the rad cowels and relocate the bumpers thats about it |
|
| Back to top |
|
|
subzero
*******
Age: 48
Zodiac:
Joined: 24 Sep 2006
Posts: 2687
Location: folkestone
|
| Posted: Thu Jul 02, 2009 23:07 Post subject: |
|
|
mines the same
just be ready to run |
|
| Back to top |
|
|
richardsth
******
Age: 61
Zodiac:
Joined: 01 Feb 2006
Posts: 1397
Location: Essex
|
| Posted: Thu Jul 02, 2009 23:22 Post subject: |
|
|
| I've just been searching for this problem and it maybe that there's no oil (or not enough) in it. I did top it up a year ago which is why i didn't assume it was that. Then again it could always have been running hot like that and I've just noticed it and it's got worse because of the hot weather. Either way I'll change whatever's left tomorrow so i can rule that out. |
|
| Back to top |
|
|
|


